If you want to extend your laptop’s battery life, enabling the ‘Automatic Battery Saver‘ feature in Windows 11 is a useful approach. This feature can activate automatically when the battery charge drops to a certain level, helping to reduce power consumption. This, in turn, minimizes the need to frequently plug in your charger while working on your laptop.
The purpose of the ‘Battery Saver’ feature in Windows 11 is to manage battery usage. When activated, it may limit certain background activities, reduce the activity of specific apps, and lower the screen brightness. These adjustments can improve your laptop’s battery life, though the actual results will depend on your laptop’s hardware, the condition of the battery, and how you use the device.
In this guide, we will explore how to enable the ‘Automatic Battery Saver’ in Windows 11, how to set the battery percentage threshold, how to activate it manually, and how to troubleshoot the feature if it is not working as expected.
What is ‘Automatic Battery Saver’ in Windows 11?
‘Automatic Battery Saver’ is a Windows 11 feature that can automatically turn on ‘Battery Saver’ mode once the battery charge reaches a specified level. For instance, if you set the threshold to 20%, the feature will activate automatically when your battery charge drops to 20%.
Its primary goal is to reduce your laptop’s power consumption, allowing you to work for longer periods on the remaining battery charge.
When ‘Battery Saver’ is enabled, Windows may restrict certain processes that typically run continuously in the background. This can affect tasks such as email synchronization, background app activity, and other energy-intensive processes. On some devices, it may also reduce the screen brightness.
This feature is particularly useful for those who use their laptops for online meetings, office work, studying, web browsing, or while traveling. How to Enable Automatic Battery Saver in Windows 11
You can use the Settings app to enable the automatic Battery Saver feature in Windows 11. Follow the steps provided below.
Step 1: Open Windows Settings
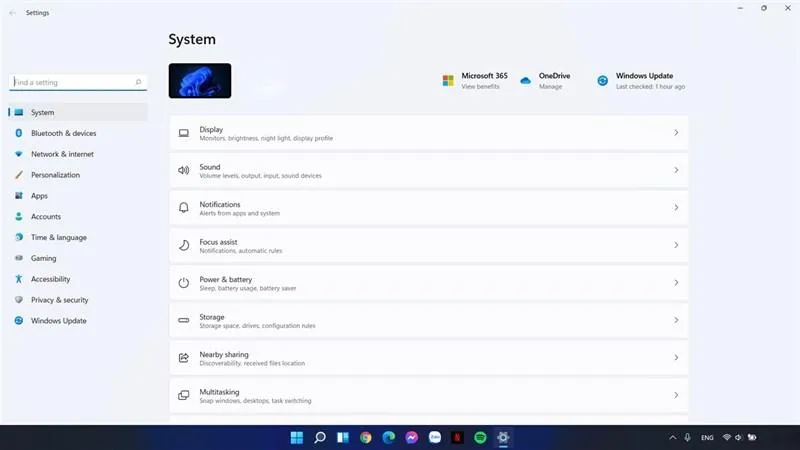
First, press Windows + I on your keyboard. This will open Windows Settings.
If the keyboard shortcut does not work, follow these steps:
1. Click the Start button on the taskbar.
2. Type “Settings” to search for it.
3. Open the Settings app that appears.
In the Settings window, you will see various system settings for Windows 11.
Step 2: Select the “Power & battery” option
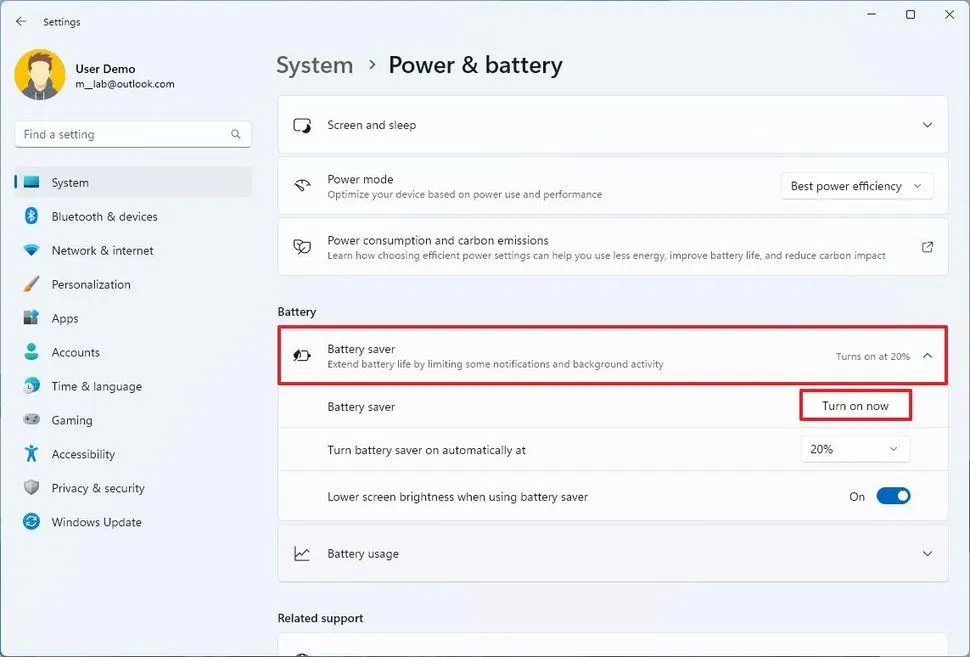
Once Settings is open, click on the “System” option on the left-hand side. Then, select “Power & battery.”
In this section, you can view the battery status, power consumption, and various power-related settings. If your laptop is running on battery power, you may see options related to the current battery percentage and the Battery Saver feature.
Please note that not all battery-related options appear on desktop computers, as they typically do not have a battery like a laptop does.
Step 3: Locate the “Battery Saver” setting
Scroll down on the “Power & battery” page and find the “Battery Saver” section.
Depending on the version of Windows 11, the name, location, and available options in this section may vary slightly. In some versions, you will find options to turn on Battery Saver manually, set the battery percentage at which it should activate automatically, and reduce screen brightness.
If you do not see a direct option for “Battery Saver” on your system, check for Windows Updates and review your device’s power management settings.
Step 4: Set the percentage for Automatic Battery Saver
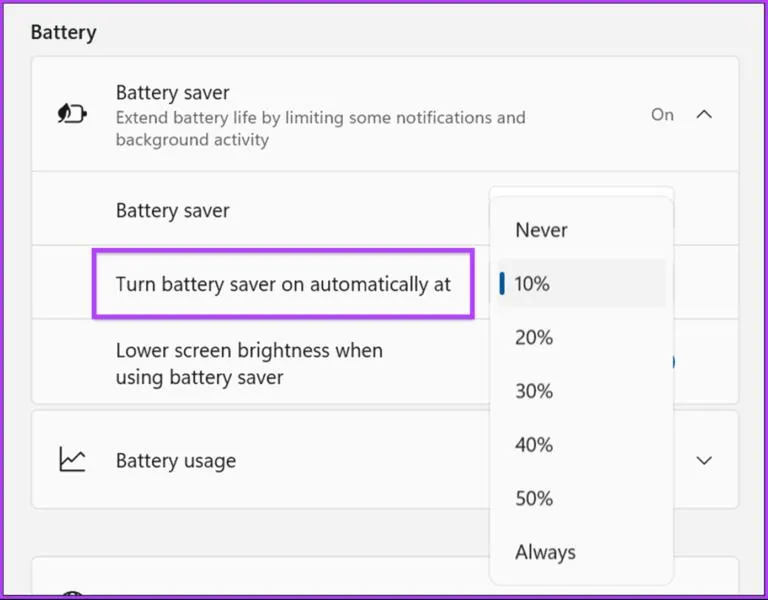
In the “Battery Saver” section, look for an option labeled “Turn battery saver on automatically at” (or something similar).
If this option is available, use the dropdown menu to select the battery percentage at which you would like the Battery Saver feature to activate automatically. For example:
– 10%: Battery Saver will activate later, leaving more of the battery’s capacity available for regular tasks.
– 20%: This can be a practical choice for daily use.
– 30%: This may be useful if you need to work away from a charger for an extended period.
– 50%: If conserving battery life is your priority, you might consider setting it to activate at this level.
Please note that the percentages available in the dropdown menu may vary depending on your version of Windows and your specific device. The percentages mentioned above are just examples; they may not be available on every system.
For general use, you could start with 20%. If your laptop is frequently used away from a charger, you can choose a higher percentage based on your needs.
Step 5: Let Battery Saver activate automatically
Once you have selected the battery percentage, apply the setting. If your version of Windows displays a separate “Apply” or “Save” button, be sure to click it.
Now, Battery Saver will activate automatically whenever the battery level drops to the specified threshold. You won’t need to turn it on manually every time.
In some versions of Windows, the charging status can also affect how Battery Saver behaves when the laptop is plugged into a charger. Therefore, it is a good idea to test these settings while the laptop is running on battery power.
How to quickly turn on Battery Saver in Windows 11?
If you want to reduce power consumption before your battery charge runs low, you can manually enable “Battery Saver” or “Energy Saver.”
Follow the steps below:
1. Click the battery icon on the right side of the taskbar or open “Quick Settings.”
2. Look for “Battery Saver” or “Energy Saver” among the available options.
3. Click on the option to activate it.
4. If you do not see the option, press `Windows + I` to go to Settings > System > Power & battery.
Please note that in newer versions of Windows 11—specifically version 24H2 and later—”Energy Saver” has replaced the traditional “Battery Saver.” The specific names of these options may vary depending on your version of Windows.
What is the difference between Battery Saver and Energy Saver in Windows 11?
Understanding the distinction between these two terms is helpful for grasping how battery-saving settings work in Windows 11.
| Feature | Battery Saver | Energy Saver |
| ———————– | —————————— | ———————————————— |
| Primary Purpose | Reduce battery consumption | Reduce power consumption and battery usage |
| Automatic Activation | Based on configured settings | Can activate at a specified battery level |
| Background Activities | Certain activities are limited | Power consumption of the system and apps is managed |
| Availability | In older Windows 11 versions | In Windows 11 24H2 and later versions |
According to Microsoft, “Energy Saver” replaces the older “Battery Saver” in Windows 11 version 24H2 and later. It also includes an option—available on certain devices—to keep “Energy Saver” enabled even while the device is connected to a charger. So, if you see “Energy Saver” instead of “Battery Saver” on your laptop, do not consider it an issue. Simply use the option that appears based on your specific version of Windows.
What to do if “Automatic Battery Saver” is not working?
Sometimes, even after enabling the setting, Battery Saver may not activate automatically. In such cases, try the solutions provided below.
1. Re-check Battery Saver settings
Go to Settings > System > Power & battery. Then, navigate to the “Battery Saver” or “Energy Saver” section and verify whether the option for automatic activation is enabled.
If the battery percentage threshold is set too low, adjust it according to your needs.
2. Check your Windows version
Press `Windows + R` on your keyboard, type `winver`, and press Enter.
Your Windows version will be displayed. If your system is running Windows 11 24H2 or a newer version, look for the “Energy Saver” option instead of “Battery Saver.”
3. Run Windows Update
Outdated system updates or software-related issues can sometimes cause settings to appear differently.
– Open Settings.
– Go to Windows Update.
– Click on “Check for updates.”
– Install any available important updates.
– Restart your laptop if necessary.
4. Check for battery-draining apps
If your battery continues to drain rapidly even with Battery Saver enabled, check which apps are consuming the most power.
To do this, go to Settings > System > Power & battery > Battery usage. Review the battery consumption by various apps and limit any unnecessary background activity.
Keep in mind that tasks like video editing, gaming, running resource-intensive software, or using high screen brightness can cause the battery to drain quickly, even when Energy Saver is active.
7 Useful Ways to Improve Battery Life in Windows 11
In addition to enabling ‘Automatic Battery Saver,’ you can reduce battery consumption by adjusting a few other settings.
1. Lower screen brightness: Keep the brightness at an appropriate level for your needs. Reducing the power consumed by the display helps conserve battery.
2. Shorten the screen timeout: Under ‘Power & battery’ in Settings, set a shorter duration for the screen to turn off.
3. Adjust sleep settings: Configure your laptop to enter ‘Sleep’ mode after a set period of inactivity.
4. Change the power mode: Select ‘Best power efficiency’ under ‘Power mode’ if available.
5. Close unnecessary apps: Shut down any non-essential apps running in the background.
6. Turn off Wi-Fi and Bluetooth: Disable these features when they are not in use.
7. Check ‘Energy recommendations’: Go to Settings > System > Power & battery > Energy recommendations and apply the suggested settings to save power.
These changes can help reduce battery consumption. The actual battery life (backup) will depend on the laptop’s battery capacity, its age, the processor, and how it is used.
Conclusion
Enabling ‘Automatic Battery Saver’ or ‘Energy Saver’ in Windows 11 is an easy way to reduce your laptop’s power consumption. To do this, go to Settings > System > Power & battery and configure the automatic activation option according to your version of Windows.
If you want to further improve your battery life, consider lowering the screen brightness, closing unnecessary background apps, and selecting ‘Best Power Efficiency’ under the Power Mode settings. These adjustments can help you manage your laptop’s usage more effectively for your daily needs.
Frequently Asked Questions (FAQs) about Windows 11 Automatic Battery Saver
1. How do I enable Automatic Battery Saver in Windows 11?
Open Settings and go to System > Power & battery. Then, look for the automatic activation option within the Battery Saver or Energy Saver section and select the battery percentage that suits your needs.
2. Can Battery Saver turn on automatically in Windows 11?
Yes. If the automatic activation option is available for your Windows version and device, you can set it to turn on automatically at a specific battery level.
3. Where is Battery Saver located in Windows 11 24H2?
In Windows 11 24H2 and later versions, “Energy Saver” replaces the traditional “Battery Saver.” You can find it under Settings > System > Power & battery.
4. Does enabling Battery Saver make the laptop battery last longer?
Battery Saver helps reduce power consumption, allowing the available charge to last longer. However, the actual improvement in battery life depends on the tasks you are performing and your laptop’s hardware.
5. Can keeping Battery Saver enabled slow down the laptop?
Some power-saving settings may affect background activities or overall system performance. If you are using resource-intensive software, playing games, or performing video editing, adjust your power settings according to your requirements.
6. Can Energy Saver remain enabled while the laptop is charging?
Some Windows 11 versions and devices offer the option to keep Energy Saver enabled even when the laptop is connected to a charger. If this option appears on your system, you can use it as needed.
7. Which battery percentage should I choose for Automatic Battery Saver?
Starting at 20% is a practical choice for general use. If you need to work for long periods without a charger, you can select a higher percentage, depending on the options available in your version of Windows.