
When working in Windows 11, you may often need to keep one window open on top of others. For instance, if you are entering data into Excel while also using a Calculator, you might find yourself repeatedly bringing the Calculator to the foreground. Similarly, it can be challenging to view notes during an online meeting, perform other tasks while watching a video, or copy information from a document.
A useful solution to this problem is the “Always-on-Top” feature. It allows you to keep a selected window positioned above all other windows, even while you are working in a different application.
This feature is not available by default for every application in Windows 11. However, by using tools like Microsoft PowerToys, you can set the window of any standard application to “Always-on-Top.” This eliminates the need to repeatedly bring a window to the front, making multitasking much easier.
In this guide, we will explore how to keep a window “Always-on-Top” in Windows 11, including how to use keyboard shortcuts, adjust settings, and troubleshoot common issues related to this feature.
What is the “Always-on-Top” feature?
“Always-on-Top” is a feature that keeps a selected application window positioned above other standard windows. This means that even when you open other windows or work in a different program, the selected window remains visible at the very top.
For example, suppose you are researching a topic in Google Chrome while taking notes in Notepad. If you set the Notepad window to “Always-on-Top,” it will remain visible on top, even if you open other websites in Chrome.
This feature can be useful in various scenarios, such as:
Calculator: For performing calculations while working in Excel or other programs.
Notepad: For keeping important information or notes visible while conducting research. Video Player: To keep watching a video while performing other tasks (provided the player supports this).
Chat Window: To keep an eye on messages or conversations while working.
Documents: To keep a PDF or other document visible while referencing information from it.
Keep in mind that the “Always-on-Top” feature does not lock a window permanently in one spot on the screen. You can move it, resize it, and disable the feature whenever you no longer need it.
Method 1: Using Microsoft PowerToys to keep a window “Always-on-Top”
Microsoft PowerToys is one of the easiest ways to keep any standard application window “always on top” in Windows 11. It is a free tool from Microsoft that offers various useful features to customize how Windows functions. Its “Always On Top” utility allows you to keep a selected window positioned above all other standard windows.
Step 1: Download Microsoft PowerToys
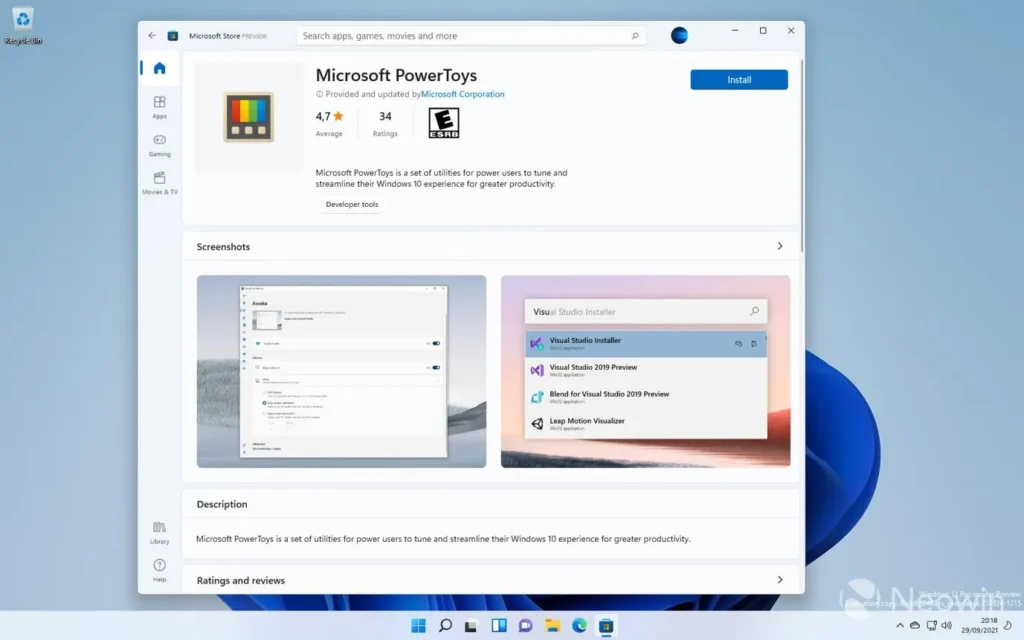
First, install Microsoft PowerToys on your Windows 11 computer.
Visit the official Microsoft website.
Select the option to download PowerToys.
Install it via the Microsoft Store or the official download page.
Once the installation is complete, open PowerToys.
PowerToys is available for Windows 11 as well as supported Windows 10 systems. You do not need to download files from unknown third-party websites to install it.
Step 2: Enable the “Always On Top” feature
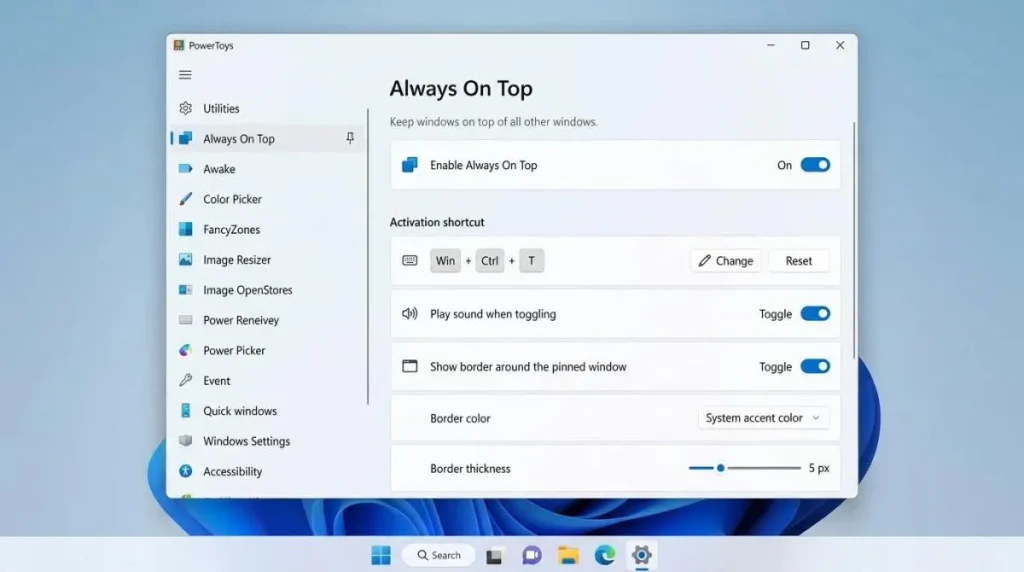
After installing PowerToys, follow these steps:
1. Open Microsoft PowerToys on your Windows 11 system.
2. Locate the “Always On Top” option in the menu on the left.
3. Click on this option.
4. Toggle the switch to enable the feature.
5. Note the keyboard shortcut listed under “Activation Shortcut.”
The feature is now ready to use. If you already have PowerToys installed, there is no need to reinstall it. Just ensure that the ‘Always On Top’ feature is enabled.
Step 3: Pin a window using a keyboard shortcut
Default keyboard shortcut:
Win + Ctrl + T
Now, open the window you want to keep on top—for example, Calculator, Notepad, or File Explorer.
1. Click on the desired window to make it active.
2. Press Windows + Ctrl + T simultaneously on your keyboard.
3. A colored border may appear around the window.
4. Now, try clicking on another application. The selected window should remain on top of other standard windows.
This shortcut applies to the window that is currently active; therefore, it is important to select the correct window before using the shortcut.
Method 2: Enable ‘Always-on-Top’ via the Window’s Title Bar
If you prefer not to use keyboard shortcuts repeatedly, you can enable an option in the PowerToys settings that adds ‘Always-on-Top’ to the right-click menu of a window’s title bar.
Follow these steps:
1. Open Microsoft PowerToys.
2. Go to the ‘Always On Top’ section.
3. Enable the option: “Show Always On Top in the title bar context menu.”
4. Right-click on the title bar of the application window you wish to pin.
5. Select the ‘Always On Top’ option from the menu that appears.
Once enabled, the window will remain pinned on top of other windows. This method is useful for those who prefer using a mouse rather than remembering keyboard shortcuts.
Please note that this option applies to the title bars of standard windows. Since different applications may have unique menus, this option might not appear in the same way across all programs.
Method 3: How to disable ‘Always-on-Top’?
When you no longer need a window to stay on top, you can return it to its normal state.
To do this:
1. Activate (bring into focus) the window you have pinned.
2. Press ‘Windows + Ctrl + T’ again.
3. The window will be unpinned and will behave like a standard window.
Alternatively, you can simply close the window. According to Microsoft PowerToys, the same keyboard shortcut can be used to disable the ‘Always-on-Top’ feature.
If you have accidentally pinned the wrong window, simply select that window and use the shortcut to unpin it.
Essential Settings for PowerToys ‘Always-on-Top’
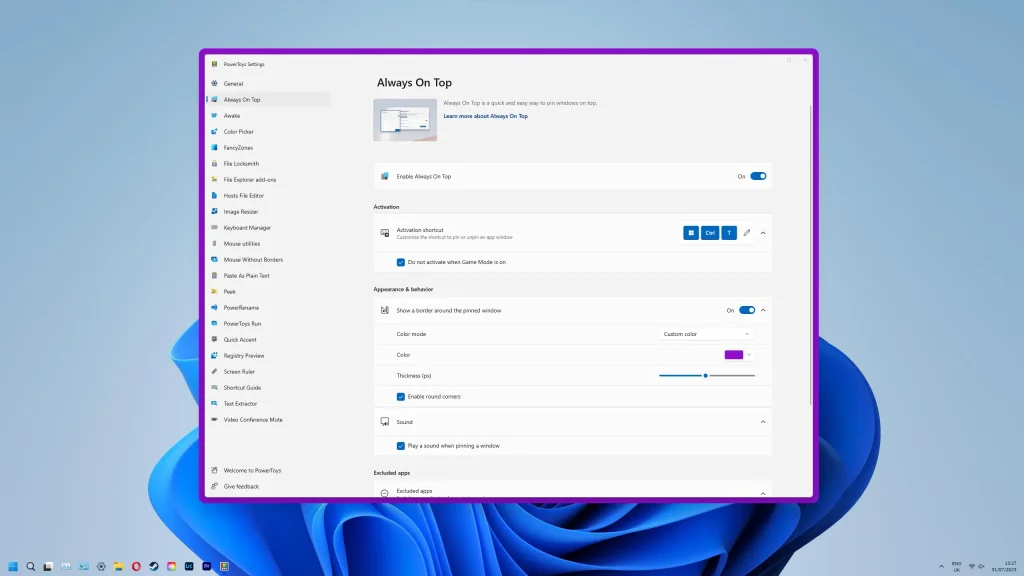
You can configure this feature in Microsoft PowerToys to suit your preferences. Please note that the names of settings and the available options may vary depending on the version you have installed. Setting Function
Activation Shortcut: Change the shortcut used to pin or unpin a window
Show a border around the pinned window: Display a border around the pinned window
Color mode: Select the color of the border
Thickness: Set the thickness of the border
Play a sound when pinning Play a sound when pinning or unpinning a window
Excluded apps: Add applications to a list that should not be pinned
Do not activate when Game Mode is on: Prevent the feature from working when Game Mode is active
These options make it easy to identify pinned windows and help prevent the accidental pinning of unwanted windows.
What to do if ‘Always-on-Top’ is not working in Windows 11?
Sometimes, even after installing PowerToys, a window may not stay on top. In such cases, try the following solutions:
1. Check if PowerToys is running
Look for the PowerToys icon in the system tray. If the application is closed, reopen it. Then, go to the ‘Always On Top’ settings and ensure that the feature is enabled.
2. Select the correct window
Click on the window you wish to pin before pressing the keyboard shortcut. If a different window is currently active, the shortcut might be applied to that one instead.
3. Verify the keyboard shortcut
The default shortcut is Windows + Ctrl + T. If you have changed it in the settings, use the new shortcut. Also, check to ensure that no other program is using the same shortcut.
4. Check settings if the border is not visible
A border around a pinned window is not mandatory. If the border option is disabled, the window will remain pinned, but no border will appear. Check the border settings within PowerToys to ensure it is enabled.
5. Check Remote Desktop and Virtual Machines
Certain environments, such as Citrix, Remote Desktop, and VMware, may also force their own windows to stay on top. In such cases, a window pinned using PowerToys might not appear on top as expected. This does not necessarily mean there is an issue with your computer.
6. Try restarting your computer
If other solutions do not work, try closing and reopening PowerToys. If necessary, restart your computer and test the feature again.
Can you keep a window “always on top” in Windows 11 without PowerToys?
Windows 11 includes features like Snap Layouts and standard window management tools, which allow you to organize multiple applications on a single screen. However, Snap Layouts and the “Always-on-Top” functionality are distinct features.
Snap Layouts help arrange windows into specific sections on the screen, whereas “Always-on-Top” keeps a selected window positioned above other standard windows.
If an application already includes its own “Always on Top,” “Keep on Top,” or a similar built-in option, you can use that. However, if you need to pin various standard application windows, PowerToys serves as a useful solution.
Conclusion
Keeping a window “always on top” in Windows 11 is a useful way to streamline multitasking. With Microsoft PowerToys, you can pin applications—such as Calculator, Notepad, File Explorer, and other supported windows—in just a few seconds.
To get started, install PowerToys, enable the “Always On Top” feature, make the desired window active, and press `Windows + Ctrl + T`. When you no longer need it, simply press the same shortcut again to return the window to its normal state.
If you frequently work with multiple applications on Windows 11, this feature is well worth trying.
Frequently Asked Questions (FAQs) about “Always-on-Top” in Windows 11
1. What is the keyboard shortcut for “Always-on-Top” in Windows 11?
In Microsoft PowerToys, the default shortcut is Windows + Ctrl + T. This allows you to pin or unpin the active window.
2. Is the “Always-on-Top” feature free?
Yes, Microsoft PowerToys is available for free. It provides access to a variety of additional features for Windows.
Microsoft Developer
3. Can more than one window be set to “Always-on-Top”?
Yes, you can pin multiple windows using PowerToys. However, which pinned window appears in the foreground may depend on their relative positioning and which window is currently active.
4. Does using “Always-on-Top” force a window to remain in full-screen mode?
No. This feature keeps a window positioned above other standard windows; it does not automatically set the window to full-screen mode. You can still resize the window as needed.
5. Is a computer restart required to disable “Always-on-Top”?
No. Simply make the relevant window active and press `Windows + Ctrl + T`. This will unpin the window.
6. Does this feature work while playing games?
Its behavior depends on the specific game and the display mode. PowerToys includes an option to disable the feature during “Game Mode.” Additionally, some full-screen games may prevent pinned windows from appearing on top.
7. Does “Always-on-Top” require an internet connection?
Once PowerToys is installed and the feature is enabled, this window-pinning functionality operates locally on your computer. It does not require a continuous internet connection for its core operation.


3 comments